Intro and Server Set Up
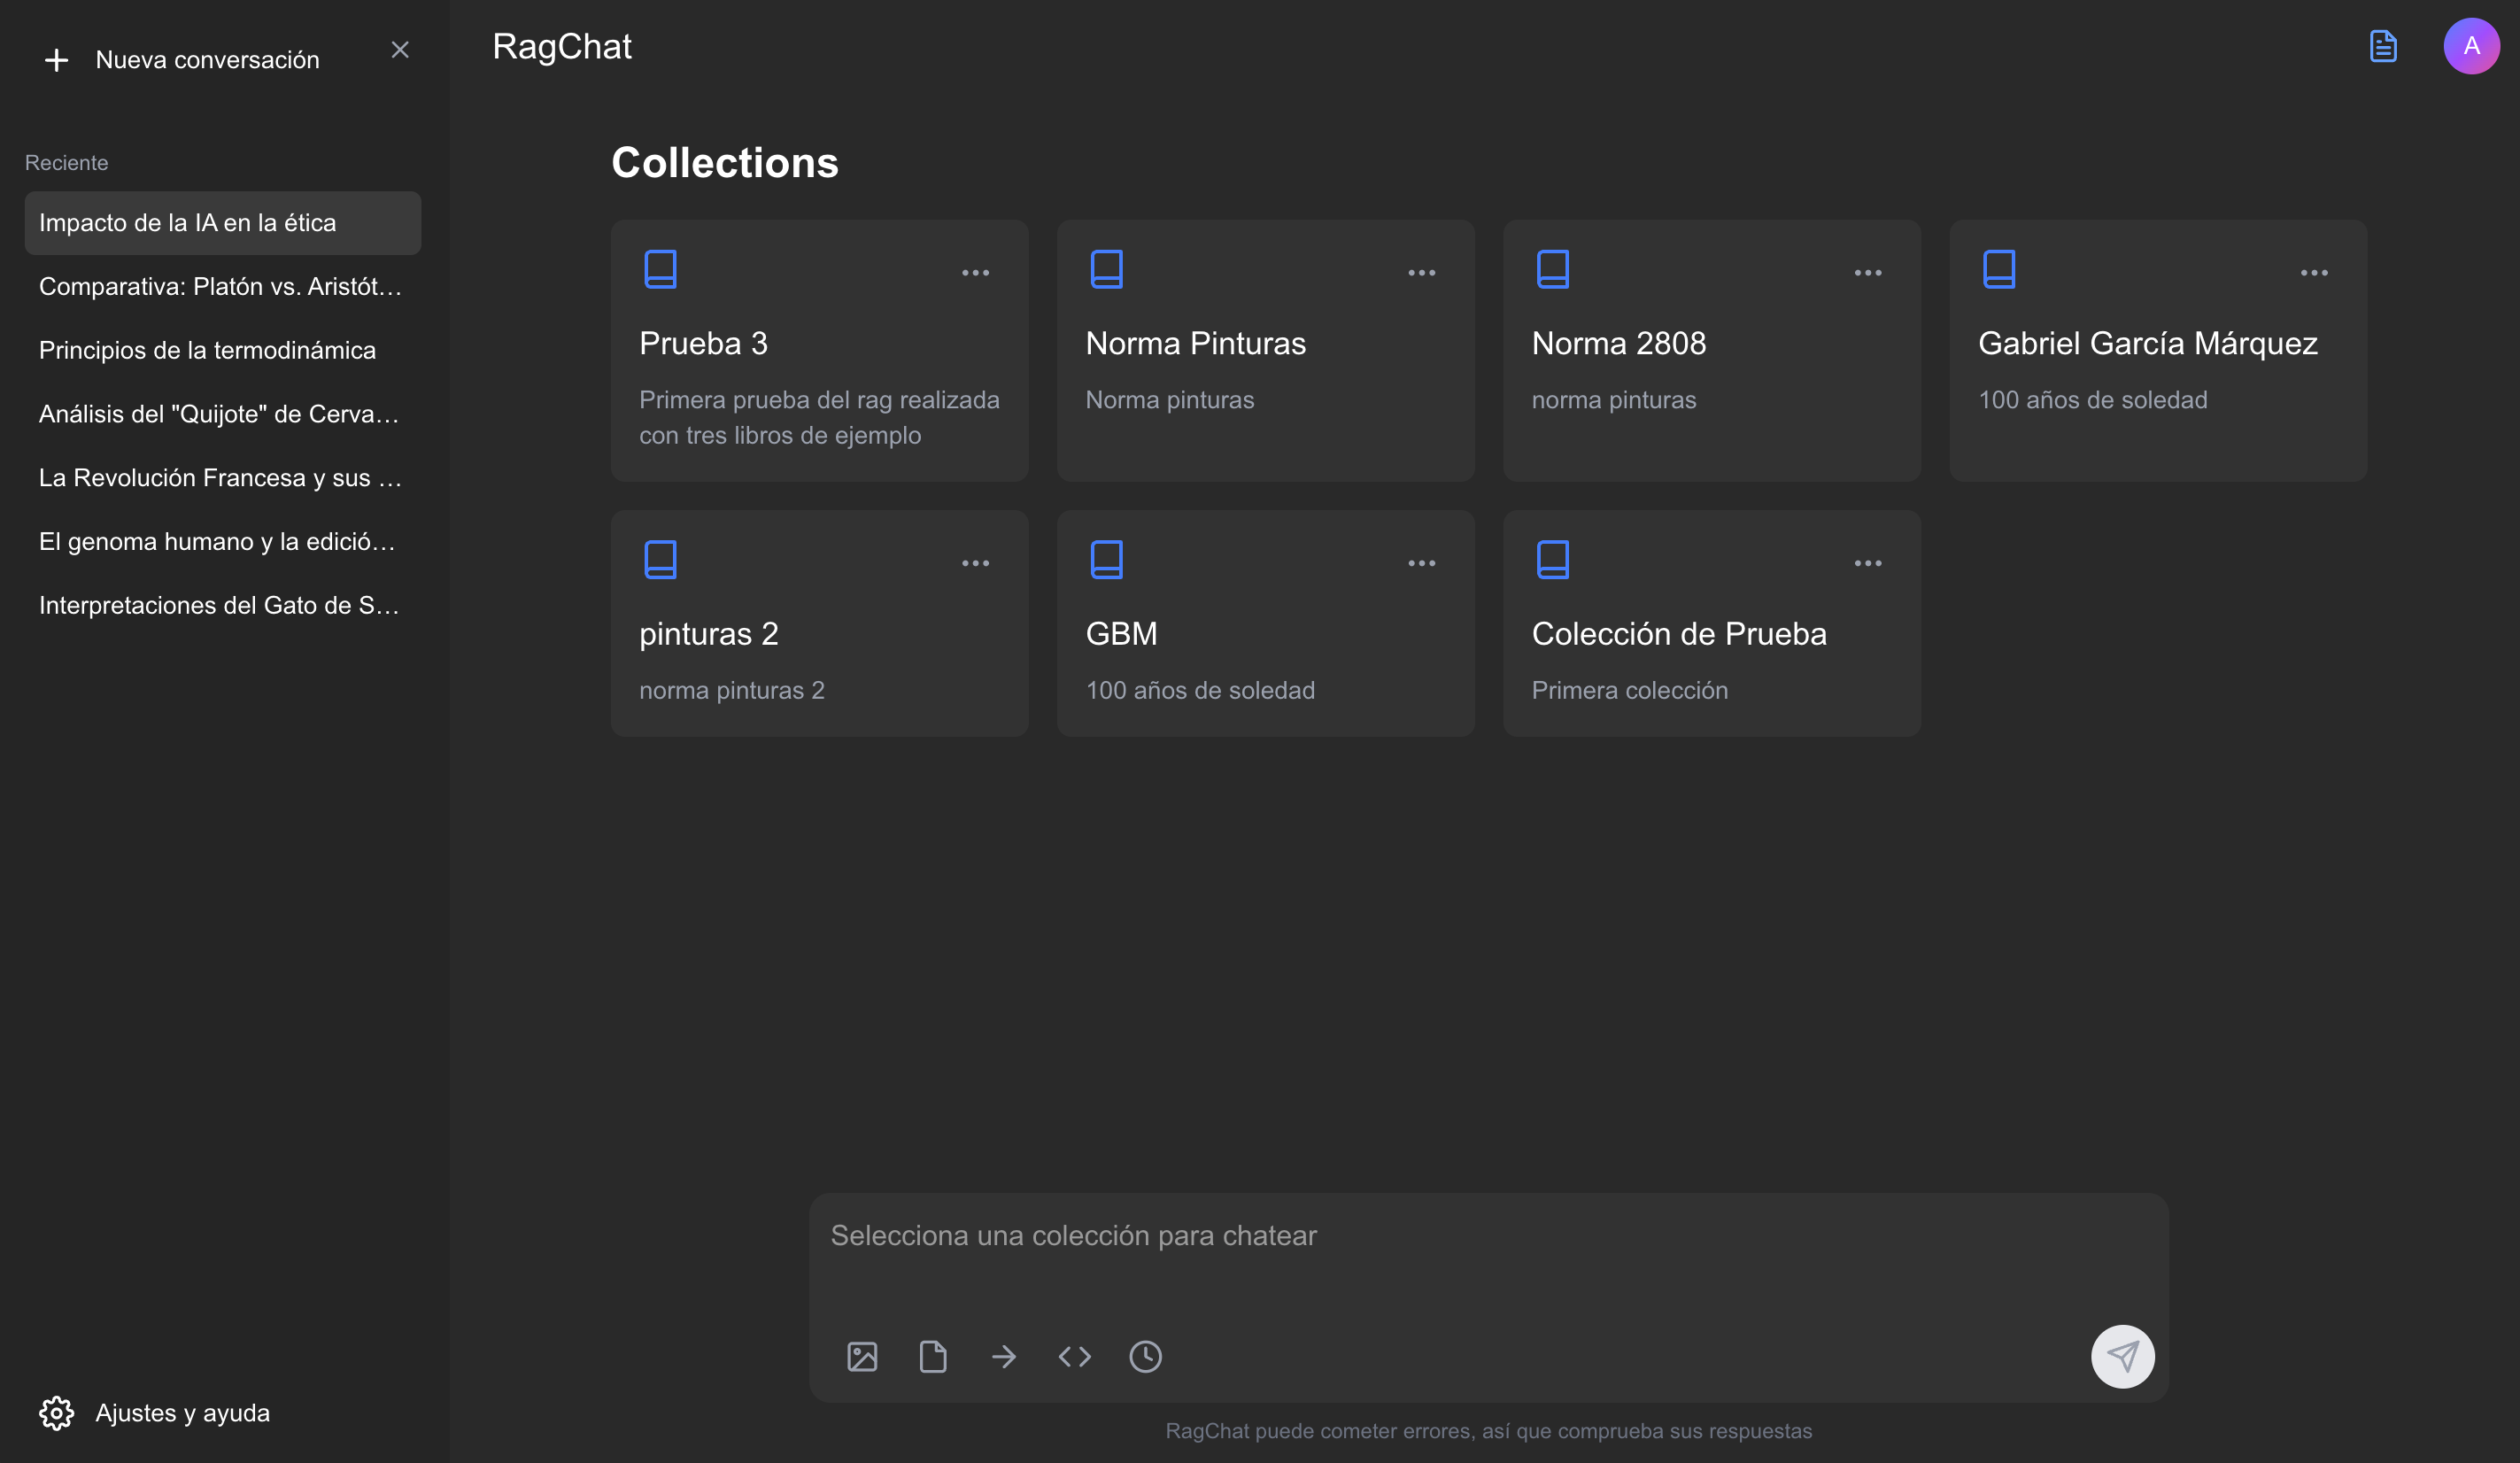
What if a RAG wasn’t something just for organizations or companies? a service that is complex to start, or complex to understand. That’s why I want to build a simple RAG service, with hand by n8n, where changes cab be easily adapted and many new features can be integrated.
The system will be a platform where users can create collections of documents, chat with that documents, and also colaborate with more users to add more documents or share their collections with more users to chat. This system will have this features:
- Simple login (not using a safe login)
- Document collection creation and sharing
- Chat with collections and source reference
“Let’s create a RAG service, open for all people, usable for everyone, something everyone could use. And for readers and developers.”
✅ Steps
The project will be splitted in a few general sections so everyone could know how to start this kind of systems from scratch. These are the sections:
1. 🛜 Server configuration: from a Linux Linode instance, install PostgreSQL, Nginx Docker and pull a n8n image.
1. 💽 DB design: create a database that can handle vectors, files and users, and useful for RAG tasks.
1. 🛠️ Document scrapping API: a simple python API that can extract and segment information from files, used to scrapping documents and files.
1. 🔗 n8n workflows and endpoints: fully working backend functions, capable of handle users, conversations, documents and collections
🛜 Server Configuration
“At this point we need a Linode instance, since Linode provides static IP addresses; and a domain, so we can get an SSL certificate to use HTTPS for secure web communications. In this case I bought the sombrasystems.com. You can get one at the link bellow, a .space domain will be pretty cheap.”
0️⃣ DNS Domain Setup
“⚠️ This step is pretty important, and needs to be done at least half a day before proceed to the next steps. What we’ll do next is create a DNS record that points to our instance IP address.”
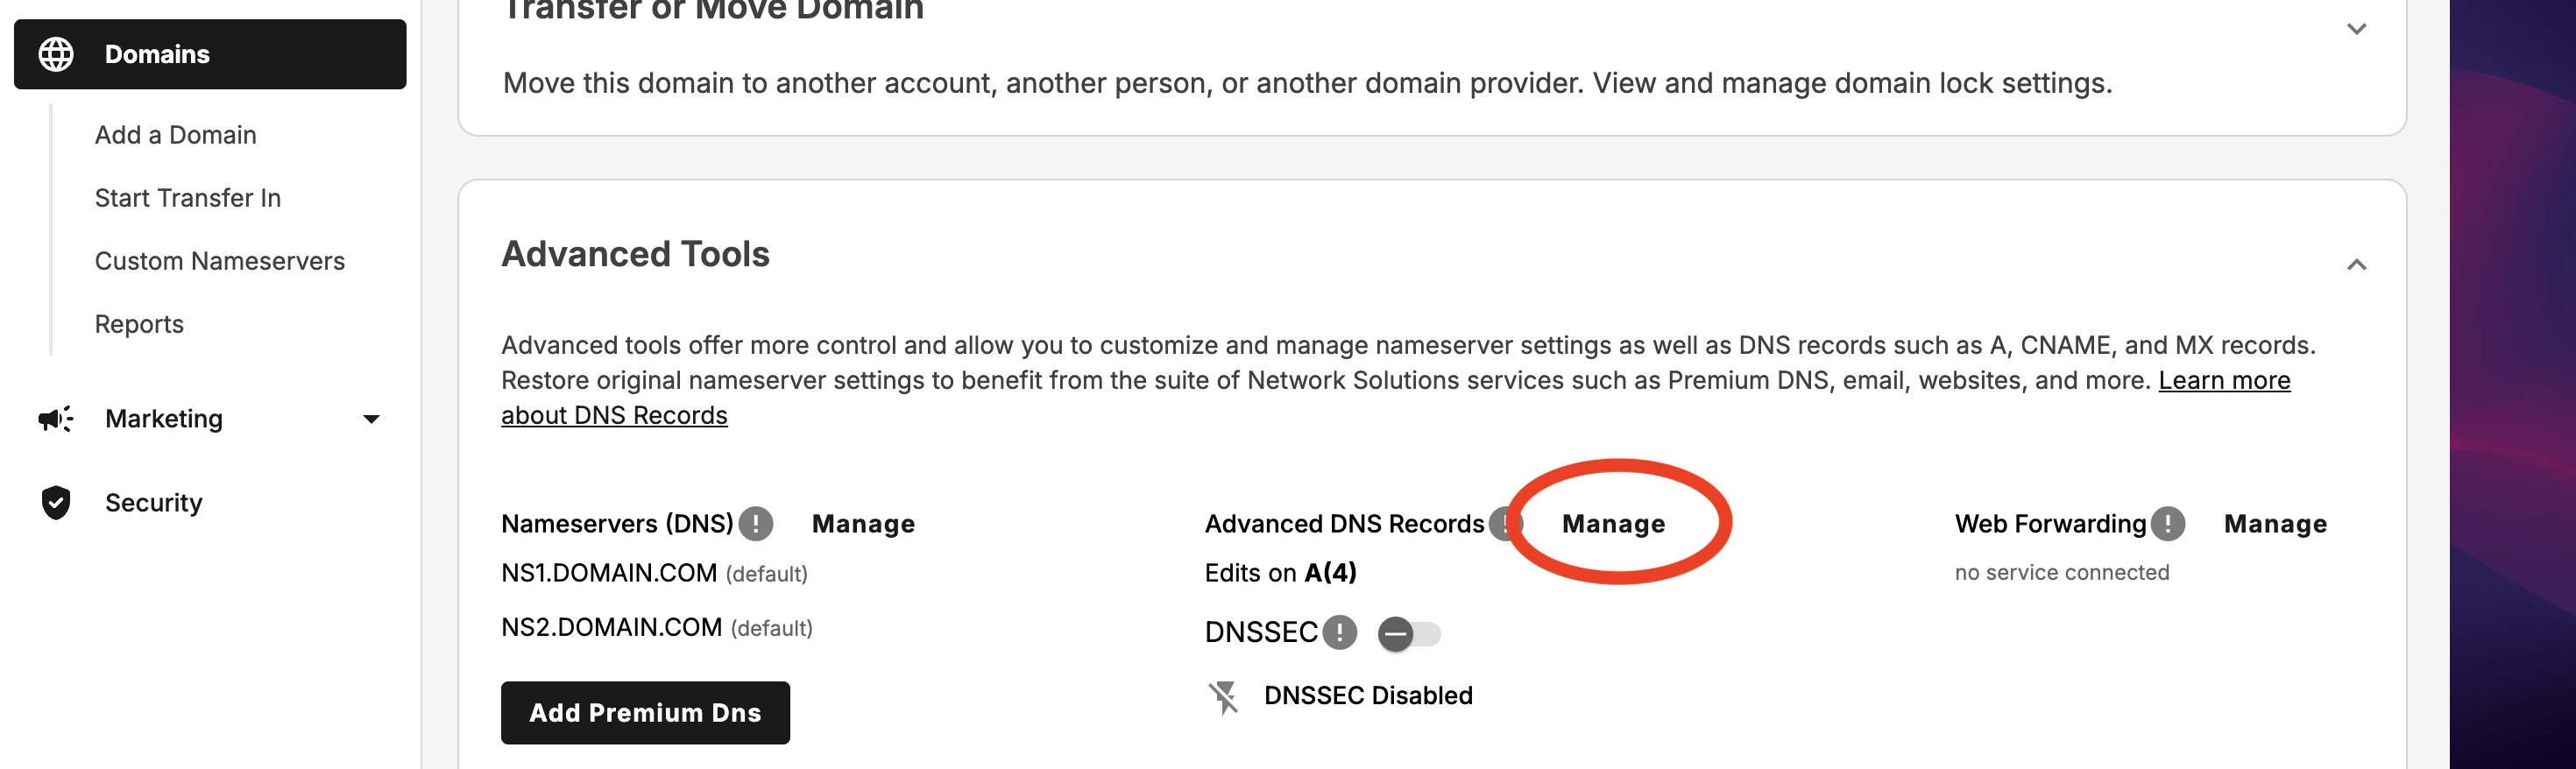
So, once we get a domain purchased, go to your domains, click on the three dots, and manage. Then scroll down until you see the Advanced Tools section. Click on Manage
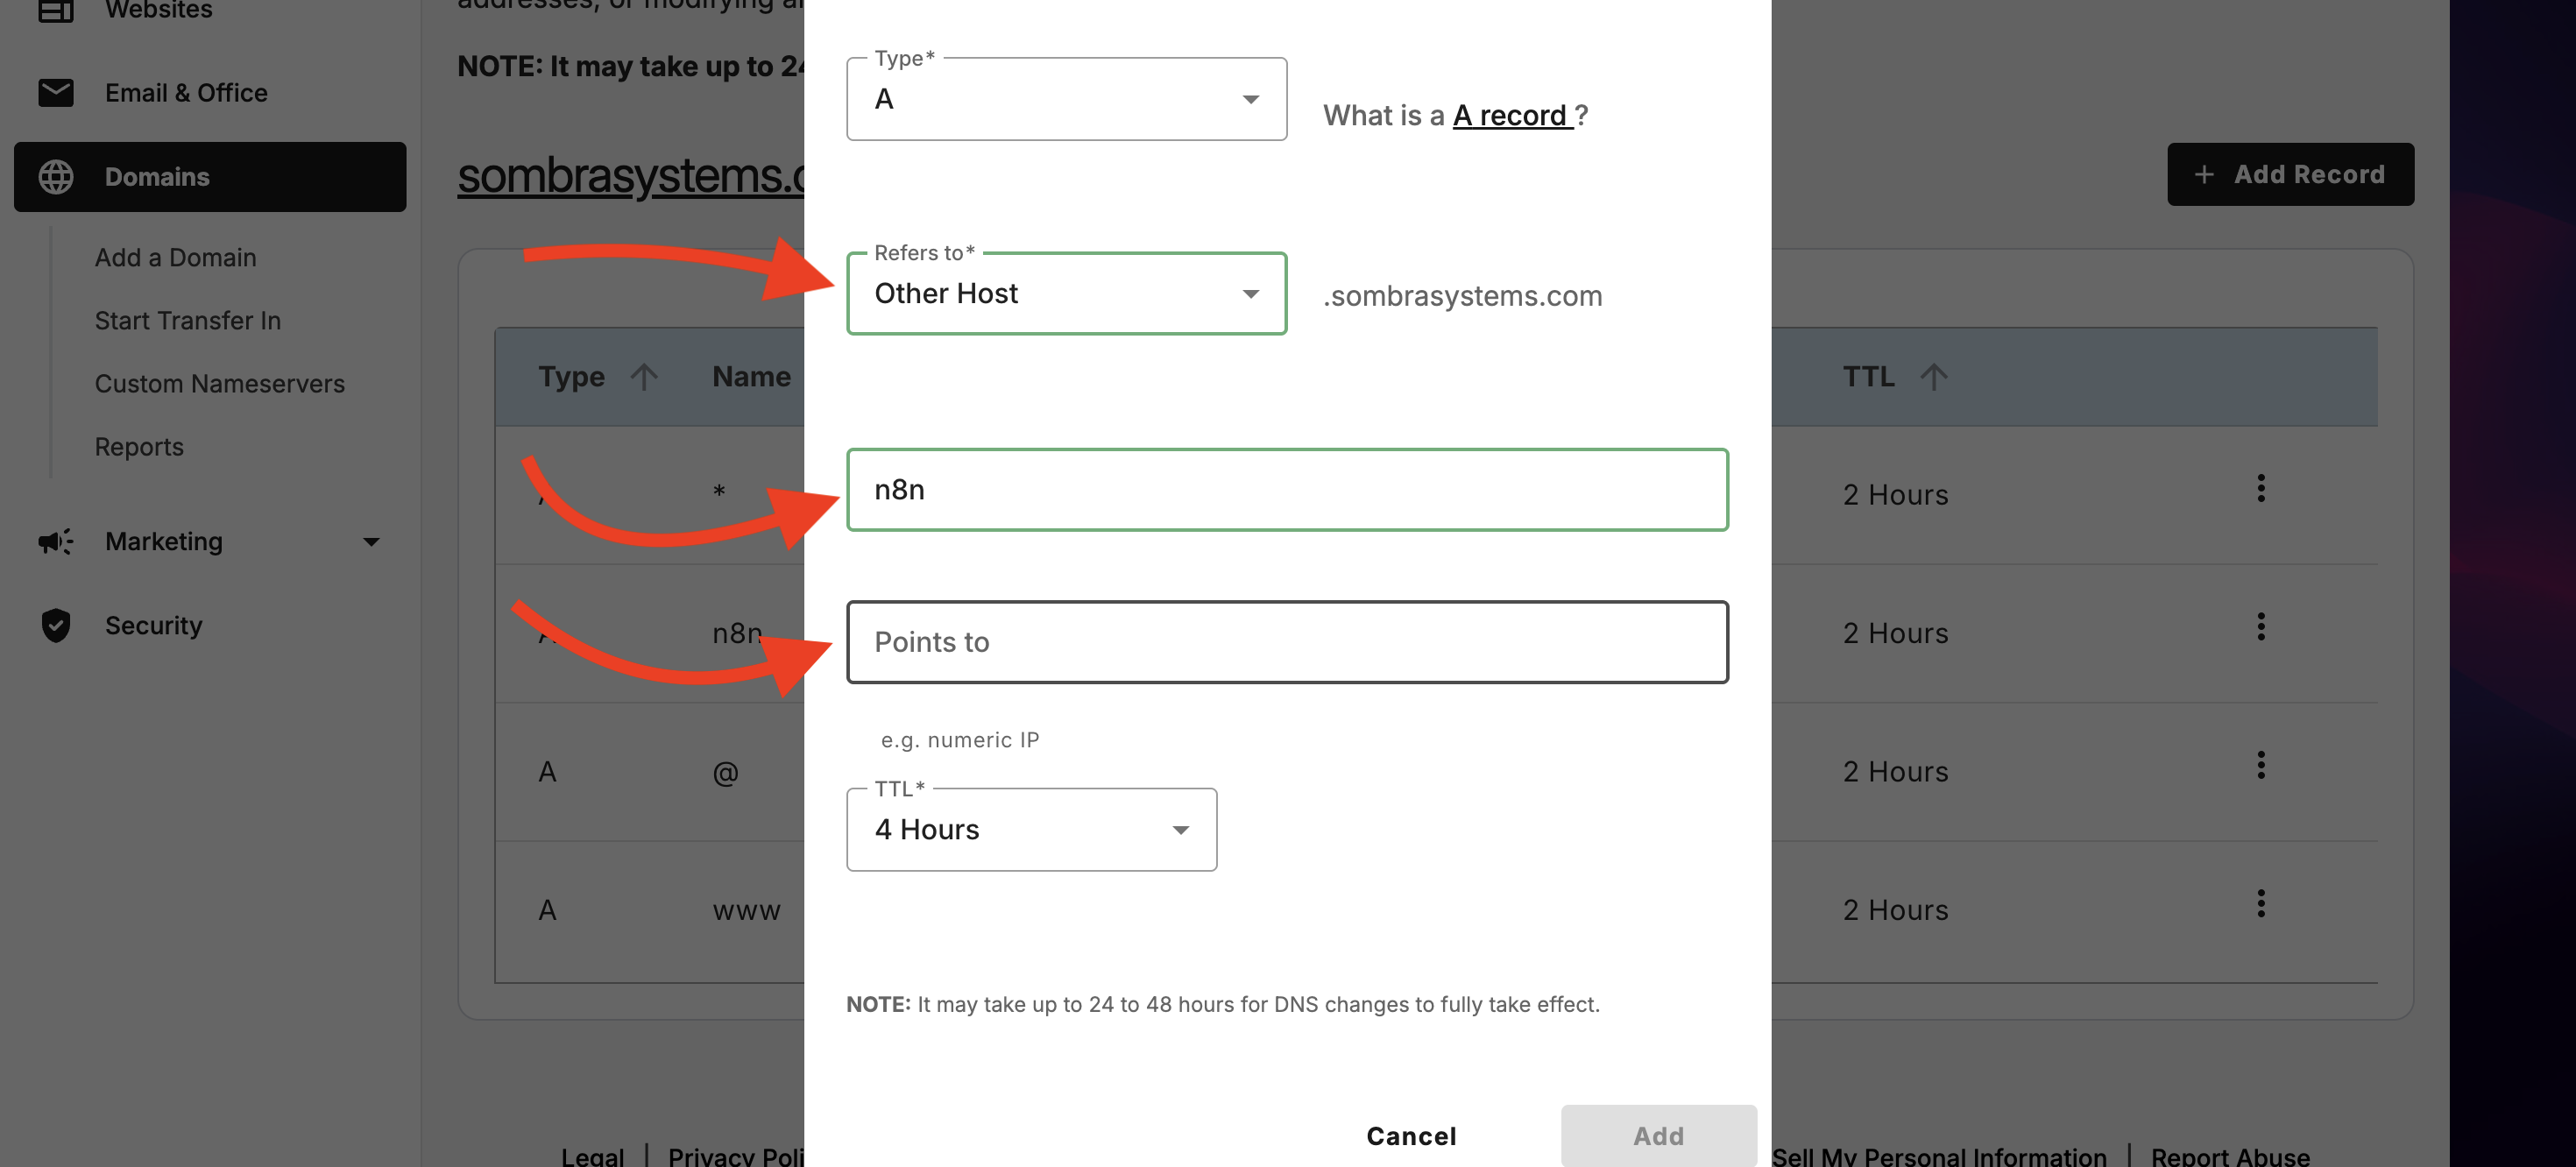
Add a Record

You will see that form, fill it with these values
- Type: chose A, that is for IPv4
- Refers to: chose Other Host
- Host name: this will be your subdomain name, in this case n8n
- Points to: here goes the public IP (v4) that you see in your Linode Instance
- TTL: you can let it be 4 hours
Finally let this changes propagate, this will be ready tomorrow.
1️⃣ Base System Setup
Before building, we need to prep the ground. When you first spin up a server, it's usually outdated. We need to update the repositories, install essential compilation tools (needed for Python/Database extensions later), and set the correct timezone so our logs make sense.
# Update repositories and upgrade existing packages
apt update && apt upgrade -y

# Set the server timezone (Crucial for cron jobs and logs)
timedatectl set-timezone America/Mexico_City
Next, we install build-essential. This includes GCC and Make, which are often required when Python or PostgreSQL needs to compile extensions from source.
apt install -y build-essential git curl2️⃣ User Creation & Security
Never operate as root. Running services as the root user is a massive security risk. If a service is compromised, the attacker acts as God on your machine. We will create a dedicated user (omarsaldanna), grant them sudo privileges, and lock down the front door (SSH).
# Create user and add to sudo group
adduser omarsaldanna
usermod -aG sudo omarsaldanna
Hardening SSH:
We are disabling password login. Why? Because bots scan the internet 24/7 trying to brute-force passwords. SSH Keys are cryptographically secure.
# Setup SSH directory
mkdir -p /home/omarsaldanna/.ssh
chmod 700 /home/omarsaldanna/.ssh

# Copy root's allowed keys to the new user
cat ~/.ssh/authorized_keys > /home/omarsaldanna/.ssh/authorized_keys
chmod 600 /home/omarsaldanna/.ssh/authorized_keys
chown -R omarsaldanna:omarsaldanna /home/omarsaldanna/.ssh

# Disable Root Login and Password Authentication
sed -i 's/PermitRootLogin yes/PermitRootLogin no/' /etc/ssh/sshd_config
sed -i 's/PasswordAuthentication yes/PasswordAuthentication no/' /etc/ssh/sshd_config

# Whitelist only our user
echo "AllowUsers omarsaldanna" >> /etc/ssh/sshd_config

# Apply changes restarting the service
systemctl restart ssh
3️⃣ Nginx + PHP Setup
We need a Reverse Proxy. Nginx will sit between the internet and our internal tools (like n8n). It handles SSL termination and traffic routing. We are also installing PHP to serve a simple landing page or admin dashboard if needed later.
# Install Web Server and PHP processor
apt install -y nginx php-fpm php-pgsql
systemctl enable nginx && systemctl start nginx
We create a placeholder landing page so we know the server is alive.
echo "Main page" > /var/www/html/index.php
mkdir /var/www/html/admin
echo "Admin page" > /var/www/html/admin/index.php
We pull a pre-configured Nginx setup from Gist to save time. This configuration handles the domain mapping.
# Clone config from Gist
git clone https://gist.github.com/65cde4df8e3c99fb8561245b1a08412e.git

# Move config to sites-available and symlink it
cp 65cde4df8e3c99fb8561245b1a08412e/* /etc/nginx/sites-available/n8n.sombrasystems.com
ln -s /etc/nginx/sites-available/sombrasystems.com /etc/nginx/sites-enabled/

# Reload Nginx
nginx -t && systemctl reload nginx
4️⃣ HTTPS with Certbot
Security is not optional. Modern APIs (and n8n webhooks) require HTTPS. We use Certbot to automatically fetch and configure a free SSL certificate from Let’s Encrypt.
apt install -y certbot python3-certbot-nginx

# Request certificate and force redirect HTTP -> HTTPS
# passing your domain and the email
certbot --nginx -d sombrasystems.com \\
  --non-interactive --agree-tos \\
  -m ml.omar.py@gmail.com --redirect
5️⃣ PostgreSQL + pgvector (The RAG Engine)
“This is the most critical step for an AI application. Standard databases search for keywords. For RAG (Retrieval Augmented Generation), we need to search for meaning.”
To do this, we need pgvector, an extension for PostgreSQL that allows us to store and query vector embeddings. We will use the latest version (Postgres 17).
# Install Postgres and enable service
apt install -y postgresql postgresql-contrib
systemctl enable postgresql && systemctl start postgresql

# Add official Postgres repo to get the latest version (default repos are often old)
curl -fsSL https://www.postgresql.org/media/keys/ACCC4CF8.asc | gpg --dearmor -o /etc/apt/trusted.gpg.d/postgresql.gpg

echo "deb http://apt.postgresql.org/pub/repos/apt $(lsb_release -cs)-pgdg main" > /etc/apt/sources.list.d/pgdg.list

apt update
# Install the specific version with vector support
apt install -y postgresql-17-pgvector
Database Configuration:
We create the database negocio with UTF8 encoding (essential for handling multi-language text in RAG) and ensure the postgres user is secured.
sudo -u postgres psql -c "ALTER USER postgres WITH PASSWORD '********';"

sudo -u postgres psql -c "
CREATE DATABASE negocio
  LOCALE_PROVIDER = icu
  ICU_LOCALE = 'es-ES'
  ENCODING = 'UTF8'
  TEMPLATE = template0;"
Allowing External Access (Docker):
Since n8n will run in a Docker container, it counts as an "external" connection to the database. We need to configure Postgres to listen on all interfaces and accept connections from the Docker subnet (172.17.0.0/16).
PG_CONFIG_DIR=$(sudo -u postgres psql -t -P format=unaligned -c 'SHOW config_file;' | xargs dirname)

# Listen on all IP addresses
sed -i "s/#listen_addresses = 'localhost'/listen_addresses = '*'/" \\
  $PG_CONFIG_DIR/postgresql.conf

# Allow password authenticated connections from Docker and Localhost
echo "host all all 172.17.0.0/16 md5" >> $PG_CONFIG_DIR/pg_hba.conf
echo "host all all 127.0.0.1/32 md5" >> $PG_CONFIG_DIR/pg_hba.conf
echo "host all all ::1/128 md5" >> $PG_CONFIG_DIR/pg_hba.conf

systemctl restart postgresql
6️⃣ Docker Installation
We use Docker to run n8n. This isolates the application dependencies from the host OS, making updates and backups significantly easier. We install from the official Docker repository to ensure stability.
apt install -y ca-certificates gnupg lsb-release

# Add Docker GPG keys
mkdir -p /etc/apt/keyrings
curl -fsSL https://download.docker.com/linux/ubuntu/gpg | gpg --dearmor -o /etc/apt/keyrings/docker.gpg

# Add Docker Repository
echo "deb [arch=$(dpkg --print-architecture) signed-by=/etc/apt/keyrings/docker.gpg] https://download.docker.com/linux/ubuntu $(lsb_release -cs) stable" > /etc/apt/sources.list.d/docker.list

# Install Engine
apt update
apt install -y docker-ce docker-ce-cli containerd.io docker-compose-plugin

# Start Docker and allow our user to use it without sudo
systemctl enable docker && systemctl start docker
usermod -aG docker omarsaldanna
7️⃣ n8n Deployment
Now we deploy the brain of our operation: n8n. We will use a script to manage the container lifecycle. This script ensures that every time we restart, we pull the latest image and mount the persistent data volumes correctly.
docker pull n8nio/n8n

# Clone helper scripts
git clone https://gist.github.com/8a9f4857d163c7d1a25e1d37dc9678f2.git scripts
chmod +x scripts/run_n8n.sh

# Initial run to create directory structures
./scripts/run_n8n.sh

# Fix permissions so the non-root docker user can write to volumes
chown -R 1000:1000 /home/omarsaldanna/.n8n
./scripts/run_n8n.sh
Auto-Updates:
We set up a cron job to check for updates and restart the container every 5 minutes. (Note: In a high-traffic production environment, you might want to do this manually, but for this service, we want to stay bleeding edge).
(crontab -l 2>/dev/null; echo "*/5 * * * * /root/scripts/run_n8n.sh") | crontab -8️⃣ Nginx Reverse Proxy for n8n
n8n runs on port 5678 locally. We need to expose it via n8n.sombrasystems.com securely.
Key Configuration Note:
We explicitly set client_max_body_size 20M. By default, Nginx allows very small uploads (1MB). Since we are building a RAG system, users will be uploading PDFs and text files. 20MB is a reasonable limit for documents.
vi /etc/nginx/sites-available/n8n.sombrasystems.comThe Config:
server {
    server_name n8n.sombrasystems.com;
    client_max_body_size 20M; # Essential for file uploads

    location / {
        proxy_pass <http://localhost:5678/>;
        proxy_set_header Host $host;
        proxy_set_header X-Real-IP $remote_addr;
        proxy_set_header X-Forwarded-For $proxy_add_x_forwarded_for;
        proxy_set_header X-Forwarded-Proto $scheme;

        # WebSocket Support (Required for n8n execution UI)
        proxy_http_version 1.1;
        proxy_set_header Upgrade $http_upgrade;
        proxy_set_header Connection "upgrade";
    }
}
Enable the site and secure it with SSL:
ln -s /etc/nginx/sites-available/n8n.sombrasystems.com /etc/nginx/sites-enabled/
nginx -t && systemctl reload nginx

certbot --nginx -d n8n.sombrasystems.com \
  --non-interactive --agree-tos \
  -m ml.omar.py@gmail.com --redirect
9️⃣ The Final Runtime Script
This is the script that keeps n8n running. It handles the environment variables necessary for our RAG service.
Why these variables?
- WEBHOOK_URL: Ensures n8n generates the correct public callback URLs.
- N8N_PAYLOAD_SIZE_MAX: Matches our Nginx limit.
- NODE_FUNCTION_ALLOW_BUILTIN=crypto: Crucial. We need the Node.js crypto library to generate hashes and handle secure tokens within our workflows.
#!/bin/bash
CONTAINER_NAME="n8n"
IMAGE_NAME="n8nio/n8n"
DOMAIN="n8n.sombrasystems.com"

# Cleanup old container
docker stop $CONTAINER_NAME || true
docker rm $CONTAINER_NAME || true
docker pull $IMAGE_NAME

# Launch
docker run -d --name $CONTAINER_NAME \\
  -p 5678:5678 \\
  -v /home/omarsaldanna/.n8n:/home/node/.n8n \\
  -v /home/omarsaldanna/n8n:/data/externos \\
  -e TZ=America/Mexico_City \\
  -e N8N_EDITOR_BASE_URL="<https://$>{DOMAIN}" \\
  -e WEBHOOK_URL="<https://$>{DOMAIN}/" \\
  -e N8N_PAYLOAD_SIZE_MAX=20 \\
  -e NODE_FUNCTION_ALLOW_BUILTIN=crypto \\
  n8nio/n8n
Results
At this point if everything is okey